


A quality blender is one of the most useful appliances in any kitchen. However, keeping it in excellent condition requires proper care. Learning How to Clean and Maintain Your Blender for Long-Lasting Performance will help you enjoy smoother blending, better hygiene, and fewer repair costs. With the right cleaning routine and maintenance habits, your blender can serve you efficiently for many years.
Why Blender Maintenance Is Important
Regular maintenance does more than keep your blender looking clean. It also improves performance and extends the life of the appliance. Moreover, food residue and moisture can encourage bacteria, unpleasant odors, and even damage to the motor if left unattended.
By cleaning your blender after every use, you reduce wear and ensure it continues to operate efficiently.
Clean Your Blender Immediately After Use
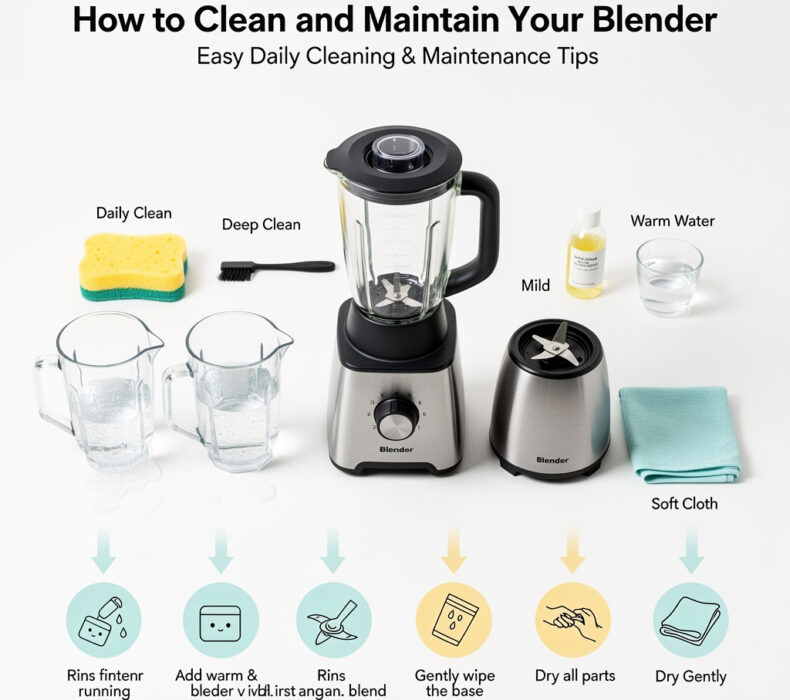
The easiest way to prevent stubborn stains is to wash your blender right after using it.
First, empty the jar completely. Next, fill it halfway with warm water and add a few drops of dish soap. Then, secure the lid and blend for about 30 seconds.
Afterward, rinse thoroughly with clean water and allow every part to air dry before reassembling.
This simple routine saves time and keeps your blender fresh every day.
Wash Removable Parts Separately
Although the self-cleaning method works well, removable parts still require occasional hand washing.
Carefully remove the lid, gasket, blade assembly, and jar if your blender allows it. Wash each component with warm soapy water using a soft sponge.
Avoid using abrasive scrubbers because they may scratch plastic surfaces or damage protective coatings.
Finally, dry each part completely before putting everything back together.
Clean the Blender Base Carefully
The motor base should never be immersed in water.
Instead, unplug the blender first. Then, wipe the exterior with a damp microfiber cloth to remove dust, spills, and fingerprints.
For stubborn stains, use a mild cleaning solution on the cloth rather than applying liquid directly to the appliance.
This practice protects the electrical components from moisture damage.
Remove Tough Stains and Odors Naturally
Sometimes strong-smelling ingredients such as onions, garlic, or spices leave lingering odors inside the jar.
Fortunately, natural cleaning solutions work very well.
Mix warm water with baking soda or white vinegar and blend the mixture for one minute. Alternatively, you can blend lemon slices with warm water to eliminate odors while leaving a fresh scent.
As a result, your blender remains clean and odor-free.
Inspect the Blades Regularly
Sharp blades are essential for consistent blending.
Every few weeks, inspect the blades for signs of wear, rust, or dullness. If the blades become damaged, replace them according to the manufacturer’s recommendations.
Additionally, never attempt to sharpen blender blades manually unless specifically instructed by the manufacturer.
Proper blade care improves efficiency and reduces stress on the motor.
Avoid Overloading the Blender
One common mistake is filling the jar beyond its maximum capacity.
Overloading forces the motor to work harder, which can shorten its lifespan. Therefore, blend in smaller batches whenever necessary.
Likewise, always add enough liquid when blending thick ingredients to reduce strain on the blades and motor.
Use the Correct Speed Settings
Different ingredients require different blending speeds.
Start with a lower speed for softer foods before gradually increasing the power. This method reduces unnecessary pressure on the motor while producing smoother results.
Furthermore, using the pulse function for hard ingredients helps prevent overheating.
Store Your Blender Properly
Proper storage is just as important as regular cleaning.
Keep your blender in a cool, dry location away from direct sunlight and excessive humidity. Store the jar with the lid slightly open to allow airflow and prevent trapped moisture.
Consequently, mold and unpleasant odors are less likely to develop.
Perform Routine Maintenance Checks
Besides cleaning, inspect your blender every few months.
Check the power cord for damage, tighten loose components, and examine rubber seals for signs of wear. If you notice unusual noises or leaks, address the issue promptly before it worsens.
Routine inspections help prevent expensive repairs later.
Common Mistakes to Avoid
To maximize your blender’s lifespan, avoid these common mistakes:
- Leaving food inside the jar for several hours
- Immersing the motor base in water
- Using harsh chemicals or abrasive cleaning pads
- Overfilling the blender
- Running the blender continuously for extended periods
- Storing the blender while still wet
By avoiding these habits, you’ll keep your appliance operating efficiently.
Conclusion
Knowing How to Clean and Maintain Your Blender for Long-Lasting Performance is essential for protecting your investment. Regular cleaning, careful handling, and routine inspections all contribute to better performance and a longer lifespan. In addition, proper maintenance keeps your blender hygienic and ready for everyday use.

 Get it on
  Download on the